Saturday, November 17, 2012

DIY: Over Sized Envelope Clutch Bag

What you'll need:
1 poster paper 18x26 inches
Decorative button and magnetic snaps
Lots of bobby pins
2 paper clamps
Pen/pencil
Ruler
Fabric glue
Foam
Hobby knife
Vinyl or leather 18x26 inches


This is a great present to make for someone with out spending loads of money or its a great way to make your own clutch that you can take any where and design the way you want it to look like. Plus this is a great clutch that you can use and say yeah that's right i made it! So if you want to see how to make this then watch the video below!

Saturday, October 13, 2012

DIY: Low-Back Bra

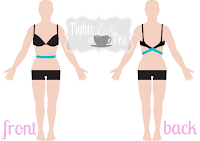
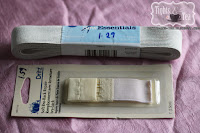
materials needed to make your own low-back bra: elastic and bra hooksDIY low back bra tutorial tights and tea tightsandtea What you'll need:
Elastic
Bra hook and eye
Sewing equipment
1 bra

Tutorial on how to make your own DIY low-back backless shirt bra


The before steps:

1. Make sure the bra hooks match up with the bra you're using; if your bra has 2 hooks, find an eye with 2 hooks. 

 Any sewing or craft store will have these; alternatively, the dollar store or thrift store might have bras you can salve hooks/eyes from (you might get funny stares at the checkout line though). I would personally get them at a discount fabric store, like Fabric Outlet in SF ($.99 up by the cash register). They're overpriced at stores like Jo-Ann.

2. Make sure the elastic is the same width as the hook and eye. It should be long enough to comfortably wrap around your waist--but don't cut it yet! Keep in mind that it will be in contact with your bare skin.


The steps:

1.  Sew either the hooks OR the eyes to one end of the elastic. I like to keep the elastic on top so the raw edge won't chafe. The type of stitch shouldn't really matter since you're not sewing in the direction of the stretch (just make sure it's securely attached).


1. There was a pre-attached elastic tag I didn't need, which I just trimmed off. Do whatever works best for you; if the hook/eye has two pieces of fabric, sew the elastic in between them.


2. Put your favorite bra on, and attach the bra's hook to the eye on the elastic. Wrap the elastic around your waist once; imagine where the elastic would attach on the other side of your bra and mark it.  
Alternatively, you can use something like 9/10ths of your waist measurement. Since it's elastic, you don't need to be exact. If it ends up being too loose, you could always sew off a pinch of elastic and trim it off?

Remember: this should be able to hold 'everything' in place, so although it shouldn't be uncomfortably constricting,it shouldn't be loose (who wants a loose bra?). Getting the right length is probably the most important step.

3. Sew the remaining hook or eye to the place you marked on your elastic, and trim the remainder. Make sure you sew on the correct sides--if the hook is facing up, the eye will face down. Try to keep the raw elastic edge on the side that won't be in contact with your skin.


How To Adjust:
To make the back tighter, tug on the elastic on your waist. To make the back looser, tug on the elastic on the back.
To make the bra back higher or lower, simply pull up or down. Adjust tightness (and bra straps) accordingly.

diy craft fashion tutorial low-back bra low back backless

DIY: Bow for a racer back shirts

Attachable Bow - Convert a Racerback in Sky BlueWhat you'll need:
Ruler
Scissors or somthing to cut with
Racer back tank top
Chalk


This is a great way on how you can make your own bow to sew on the back of your racer back tee to make it more pretty. And if you want a removable one like the picture above shows that comes in many colors you can get it at etsy.com for about $7 for each.

DIY: Gift Bag

What you'll need:
Paper 2x the size you need
Tape
Handel's from the store

1. Take a sheet of paper or wrapping paper approximately double the size that you desire your bag and fold it in half horizontally.

PhotobucketPhotobucket

2. Fold both the sides horizontally inwards and slot one side into the other, then tape together with washi tape or normal tape.

Photobucket

3. Then you fold the base of your bag in and press down forming a crease.

Photobucket

4. And then you open out one side of the base by flattening the corners into a triangle shape.

Photobucket

5. Then you will repeat step 4 with the other side of your base.

Photobucket

6. Then you fold your base inwards as shown in the picture. 

Photobucket

7. Then repeat step 6 on the other side of the base.

Photobucket

8. Tape together the base using tape.

Photobucket

9. Take store bought handles or use the handles off another paper shop bag.

Photobucket

10. Tape your handles to the inside of your gift bag and your bag is ready to go! 

Photobucket

DIY: Lace Shorts

What you'll need:
1 pair of shorts
Matching lace 2 inch wide, 6 yrds
Pins
Matching threads
Sowing needle
Ruler
Scissors


 So this is just one way on how to do it and if you don't like them you can always use different lace like the one on the right, by using vintage white lace that you can get anywhere.


DIY: Heart Sweater

What you'll need:
Print out of a heart
Wool felt
Fusible Web
Scissors
Iron


 This is a way to make your own personalized heart sweaters with having to pay a fortune for one form wild fox or forever 21. And if you have a plane sweater but you love then you can personalize it so it can look even better!


Wednesday, September 26, 2012

DIY: Wall Art Decor

What you'll need:
Printed out pictures
Hot glue gun with glue
Mod poge
Brush
Low order clear mat
2 16x20 Canvas
1 12x16 Canvas
Toilet paper rolls
Spray Paint


So this is a great and cheap project that you can do your self to decorate your room, house, or apartment. My Favorite is the flower one! So watch the video below to see how to create these amazing decorations that you can also give a gift!